Silky Low-Carb Mango Cheesecake Easy and Delicious Recipe

Silky Low-Carb Mango Cheesecake

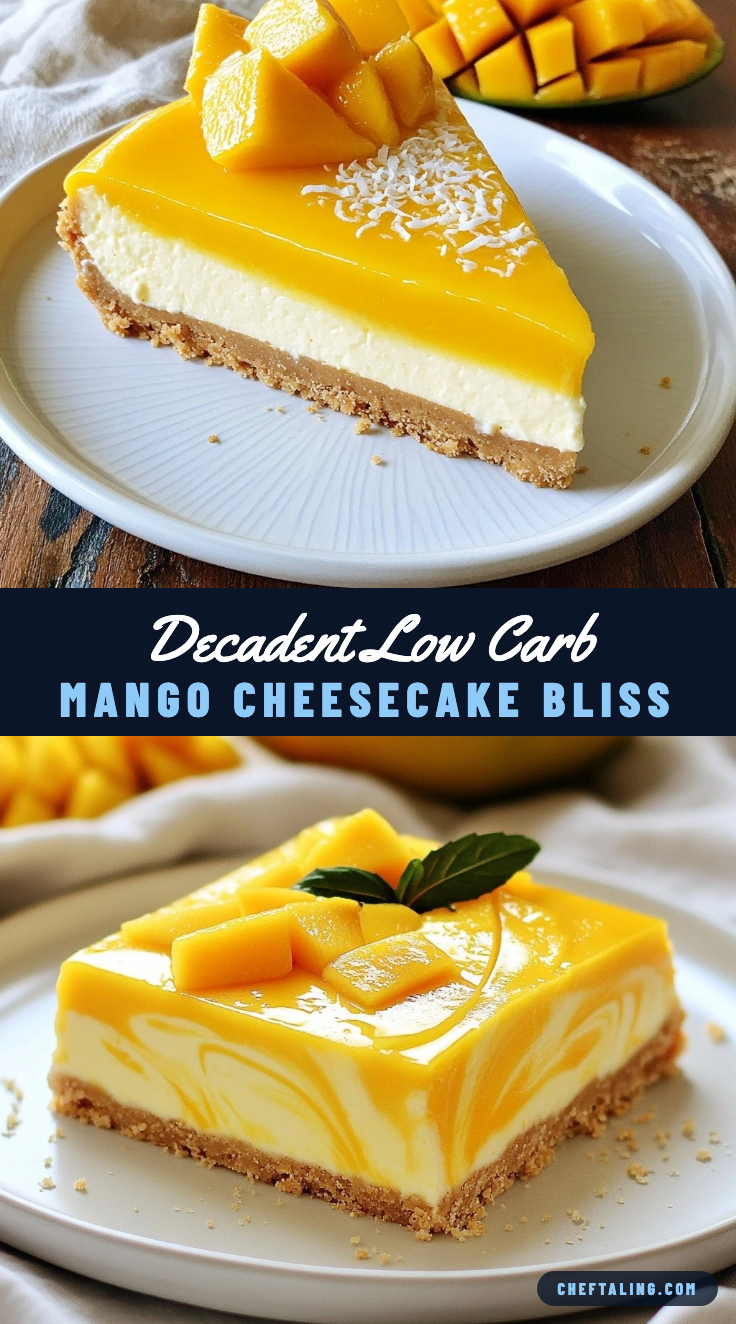
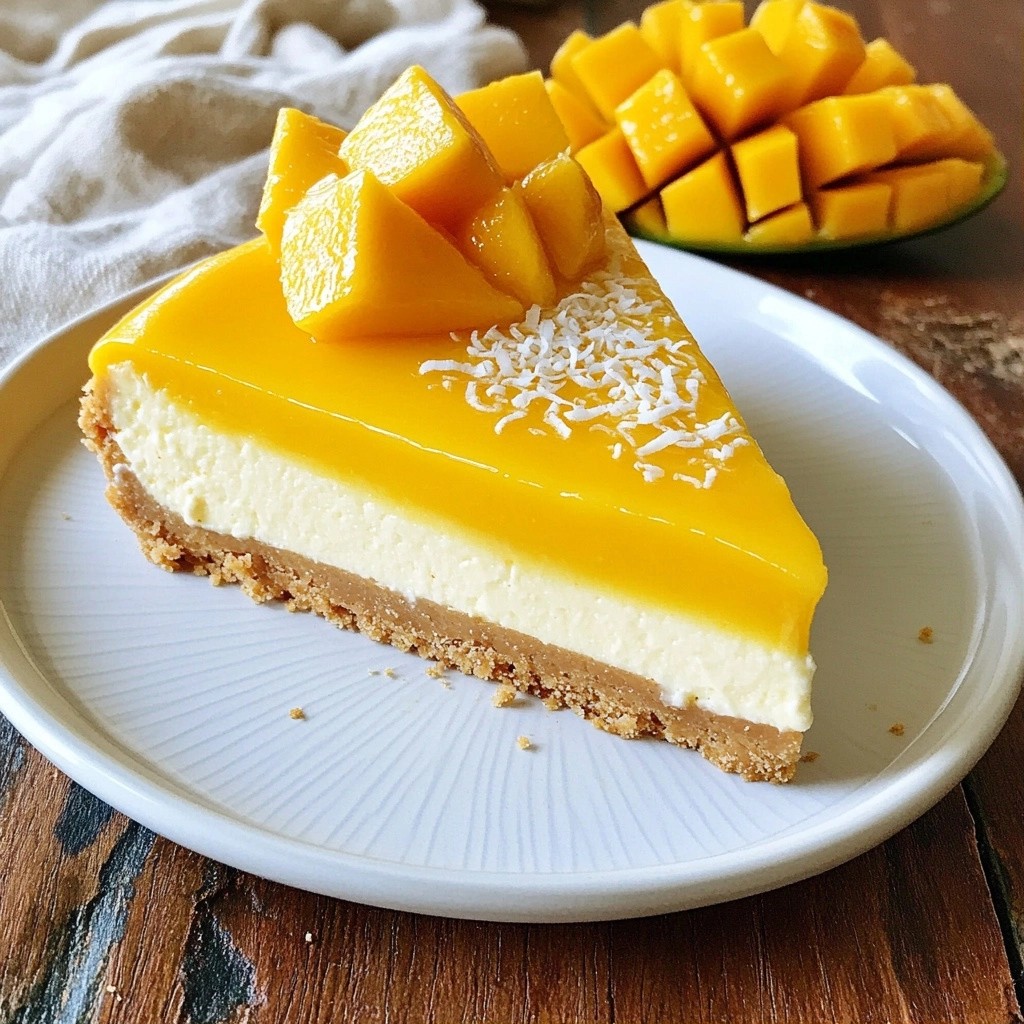
Craving a sweet treat that won’t ruin your diet? You’re in the right place! This Silky Low-Carb Mango Cheesecake recipe is easy, delicious, and perfect for any occasion. With simple ingredients like cream cheese, eggs, and ripe mango puree, you can make a show-stopping dessert that satisfies your sweet tooth while keeping carbs low. Let’s dive in and create a dessert you’ll love to share!

Why I Love This Recipe

  1. Deliciously Creamy: This cheesecake has a silky texture that melts in your mouth, making it an irresistible dessert option.
  2. Low-Carb Delight: With its low-carb ingredients, this recipe is perfect for those following a ketogenic or low-carb diet without sacrificing flavor.
  3. Fresh Mango Flavor: The ripe mango puree adds a tropical twist that brightens the cheesecake, making it a refreshing treat.
  4. Simple to Make: This recipe is easy to follow, requiring minimal ingredients and effort, perfect for both novice and experienced bakers.

Ingredients

Main Ingredients

- 1 ½ cups almond flour

- ½ cup unsweetened shredded coconut

- 1/3 cup erythritol or your favorite low-carb sweetener

- ½ cup unsalted butter, melted

- 16 oz cream cheese, softened

- ½ cup Greek yogurt

- 1 tsp vanilla extract

- 2 large eggs

- 1 cup ripe mango puree (from fresh mangoes)

- 1 tsp gelatin powder (optional, for extra firmness)

- A pinch of salt

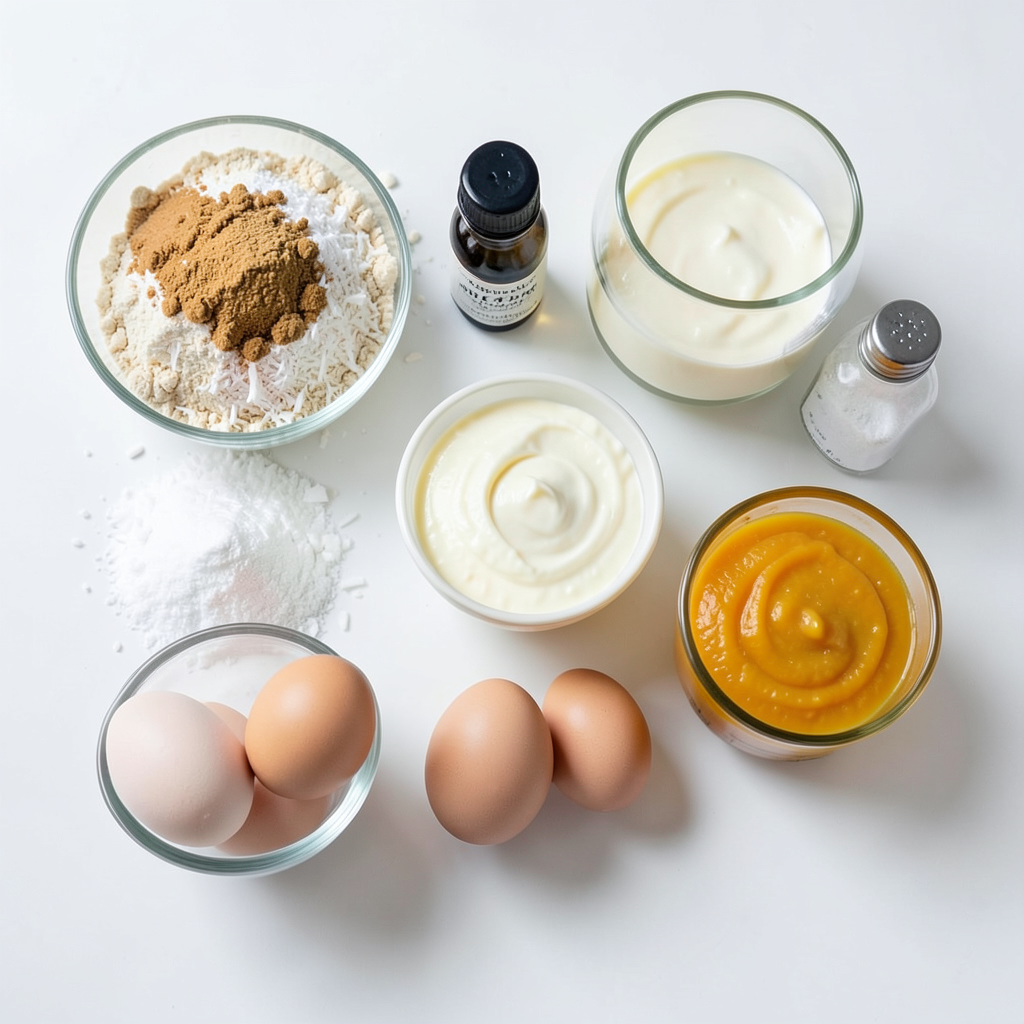
For this silky low-carb mango cheesecake, I use simple and wholesome ingredients. The base starts with almond flour and shredded coconut. These keep the crust low in carbs while giving a nice texture. I add erythritol, a great sweetener that won’t spike blood sugar. Melted unsalted butter binds everything together.

For the filling, I use cream cheese and Greek yogurt. Cream cheese gives that rich taste, while Greek yogurt adds creaminess and tang. I mix in eggs for structure and vanilla extract for flavor.

The star of this cheesecake is ripe mango puree. It brings a fresh and fruity touch. If you want a firmer texture, you can add gelatin. A pinch of salt balances the sweetness, making every bite delicious.

These ingredients work together to create a treat that is both easy to make and great for any occasion. Plus, it’s a guilt-free dessert that everyone will love!

Ingredient Image 1

Step-by-Step Instructions

Preheat the Oven

Set your oven to 325°F (163°C). This warm temperature helps the cheesecake bake evenly. While the oven heats, prepare your 9-inch springform pan. Grease it with cooking spray or butter to help the cheesecake release easily later.

Prepare the Crust

In a mixing bowl, combine these ingredients:

- 1 ½ cups almond flour

- ½ cup unsweetened shredded coconut

- 1/3 cup erythritol or your favorite low-carb sweetener

- ½ cup unsalted butter, melted

- A pinch of salt

Mix them together until the texture resembles wet sand. This will ensure a nice crust for your cheesecake.

Form and Bake the Crust

Now, press the crust mixture evenly into the bottom of your springform pan. Use the back of a measuring cup to pack it down tightly. It should feel firm. Bake for 10-12 minutes, or until it turns lightly golden. Once done, remove it from the oven and let it cool completely.

Make the Cheesecake Filling

In a large mixing bowl, beat 16 oz of softened cream cheese until smooth. This step is key for a creamy filling. Add in:

- ½ cup Greek yogurt

- 1 tsp vanilla extract

- 1/3 cup erythritol

- 2 large eggs

Mix everything until well combined.

Incorporate Mango Puree

Gently fold in 1 cup of ripe mango puree. Use a spatula and be careful not to overmix. For added firmness, you can prepare 1 tsp of gelatin by dissolving it in a tablespoon of warm water, then stir it into the filling.

Bake and Cool the Cheesecake

Pour the cheesecake filling over your cooled crust. Smooth the top with a spatula. Bake in the preheated oven for 30-35 minutes. The edges should be set, but the center can still jiggle slightly. Turn off the oven and crack the door open. Let the cheesecake cool slowly inside for about an hour. This helps prevent cracks.

Chill and Serve

Once cooled, refrigerate the cheesecake for at least 4 hours, or overnight for best results. When ready to serve, carefully remove it from the springform pan. Slice and serve chilled. You can garnish with fresh mango slices or a mango coulis for a beautiful finish.

Tips & Tricks

Achieving a Silky Texture

To get that smooth, silky texture, use a stand mixer or a hand mixer. Beat the cream cheese until it's free of lumps. This step is key. It helps your cheesecake stay creamy. Make sure your cream cheese is softened. Cold cream cheese will not blend well. Let it sit at room temperature for about 30 minutes before mixing.

Sweetener Alternatives

You have many options for low-carb sweeteners. Erythritol is popular, but you can try monk fruit or stevia. Each sweetener has a different sweetness level. If you switch sweeteners, adjust the amount to taste. Taste as you go. This way, you can find the perfect balance for your cheesecake.

Preventing Cracks

Cracks ruin the look of your cheesecake. To avoid them, cool it slowly. After baking, turn off the oven and crack the door. Let the cheesecake cool in the oven for one hour. This gentle cooling helps prevent cracks. Also, keep an eye on your oven temperature. Too hot can cause cracks, so always bake at 325°F (163°C).

Pro Tips

  1. Use Ripe Mangoes: For the best flavor, make sure your mangoes are fully ripe. They should be slightly soft to the touch and have a sweet aroma.
  2. Let it Cool Gradually: After baking, let the cheesecake cool slowly in the oven with the door cracked. This helps to prevent cracks in the surface.
  3. Chill Overnight: For optimal texture and flavor, refrigerate the cheesecake overnight. This allows the flavors to meld and enhances the creaminess.
  4. Experiment with Sweeteners: Feel free to adjust the sweetness to your liking by trying different low-carb sweeteners. Each has its unique flavor profile.

Variations

Flavor Add-Ins

You can change the flavor of your mango cheesecake easily. Consider using other fruit purees like strawberries or raspberries. These fruits add bright colors and taste. You can also try chocolate. Just add melted dark chocolate to the filling mix. For coffee lovers, mix in brewed espresso for a mocha twist. Both options work great with mango.

Crust Alternatives

If you want a nut-free crust, use oats or sunflower seeds. Grind them into a fine powder. For gluten-free options, coconut flour is a fantastic choice. Just be careful with the amount, as it absorbs more liquid. You can also use ground flaxseed or chia seeds mixed with water for a different texture. Experiment with these to find your favorite.

Vegan or Dairy-Free Options

Want a vegan cheesecake? You can swap dairy ingredients for plant-based ones. Use cashew cream or coconut cream in place of cream cheese. Greek yogurt can be replaced with vegan yogurt. For the eggs, silken tofu works well. Blend it until smooth and add it to your filling. These swaps keep the flavor rich while making it dairy-free.

Storage Information

Storing the Cheesecake

To keep your silky low-carb mango cheesecake fresh, refrigerate it right after it cools. Place it in an airtight container to avoid odors from other foods. This cheesecake stays tasty for up to five days in the fridge. I recommend slicing it first. This makes it easier to grab a piece whenever you want a treat.

Freezing Tips

You can freeze your cheesecake if you want to save it for later. To freeze, wrap the whole cheesecake or individual slices in plastic wrap. Then, place it in a freezer-safe bag or container. This keeps the flavors locked in. You can freeze it for up to three months.

When you're ready to eat it, take it out and thaw it in the fridge overnight. This method helps maintain its creamy texture. Avoid thawing it at room temperature, as this can make it watery. Enjoy your cheesecake whenever you want a sweet, low-carb dessert!

FAQs

What makes this cheesecake low-carb?

This cheesecake is low-carb due to its ingredient choices. Instead of regular flour and sugar, I use almond flour and erythritol. Almond flour has fewer carbs and more fiber than wheat flour. Erythritol is a sweetener that doesn’t raise blood sugar levels. These swaps make the dessert tasty without the extra carbs.

Can I use frozen mango puree?

Yes, you can use frozen mango puree. Just thaw it first and drain any excess water. This helps keep the cheesecake from getting too wet. If you want a smooth texture, blend the thawed puree a bit before adding it to the filling.

How long does the cheesecake keep?

The cheesecake stays fresh for about 5 days in the fridge. Look for any signs of spoilage, like off smells or a change in texture. If you see any mold, throw it away. Always store it in an airtight container to keep it fresh longer.

Can I make this cheesecake ahead of time?

Absolutely! Making the cheesecake a day or two ahead is a great idea. This allows the flavors to develop more. Just remember to chill it for at least 4 hours after baking. When ready to serve, take it out of the fridge and slice it.

Is this cheesecake suitable for diabetics?

Yes, this cheesecake is suitable for many diabetics. The key is using erythritol or other low-carb sweeteners. These do not spike blood sugar like regular sugar. Always check with a healthcare provider before trying new recipes if you have diabetes.

You now have everything you need to make a delicious low-carb cheesecake. This recipe uses almond flour, cream cheese, and ripe mango puree. It provides step-by-step instructions for creating the perfect dessert. Remember to control your oven temperature and choose the right sweeteners.

With added tips and possible variations, you can customize this cheesecake to your liking. Enjoy this treat while keeping your diet in check. Whether for yourself or loved ones, this cheesecake is sure to impress.

prep cook servings cal
Pin Recipe

Ingredients

Instructions

Fluffy Keto Cinnamon Baked Donuts Easy and Tasty Treat

Fluffy Keto Cinnamon Baked Donuts

Looking for a sweet treat that fits your keto diet? You’re in the right place! I’ll show you how to make Fluffy Keto Cinnamon Baked Donuts that are easy to whip up and full of flavor. With simple ingredients and straightforward steps, you can enjoy a delicious snack without breaking your diet. Let’s dive into the tasty world of these delightful donuts!

Why I Love This Recipe

  1. Deliciously Fluffy: These donuts have a light and airy texture, making them a delightful treat for any time of the day.
  2. Keto-Friendly: Made with almond flour and erythritol, these donuts fit perfectly into a low-carb or ketogenic diet.
  3. Easy to Make: With simple ingredients and straightforward steps, anyone can whip up a batch in no time.
  4. Customizable Toppings: Feel free to experiment with different toppings or fillings to make these donuts your own!

Ingredients

Detailed List of Ingredients

To make fluffy keto cinnamon baked donuts, you will need:

- 1 ½ cups almond flour

- ½ cup granulated erythritol (or sweetener of choice)

- 2 teaspoons baking powder

- 1 teaspoon ground cinnamon

- ¼ teaspoon salt

- 3 large eggs

- ¼ cup unsweetened almond milk

- ¼ cup melted coconut oil

- 1 teaspoon vanilla extract

- 2 tablespoons melted butter (for topping)

- Extra cinnamon and erythritol mix for coating

Key Ingredient Benefits

Each ingredient serves a purpose in this tasty treat. Almond flour is low in carbs and rich in fiber. It adds a nice nutty flavor. Erythritol is a zero-calorie sweetener that keeps sugar levels low. Baking powder helps the donuts rise. Ground cinnamon adds warmth and flavor, while salt enhances all the tastes. Eggs give structure and moisture. Unsweetened almond milk keeps things creamy without added carbs. Coconut oil adds healthy fats, making the donuts rich and moist. Finally, melted butter and the cinnamon mix create a delightful topping.

Suggested Substitutions

If you don’t have almond flour, you can try coconut flour, but use less. For the sweetener, you can use stevia or monk fruit. If you're allergic to eggs, consider using flax eggs or applesauce as a binder. Unsweetened soy milk or regular milk can replace almond milk. And if you want a dairy-free option, skip the butter or use a plant-based alternative. These swaps can still create delicious donuts.

Ingredient Image 1

Step-by-Step Instructions

Preparation Steps

Start by preheating your oven to 350°F (175°C). This helps the donuts bake evenly. Next, grease a donut pan lightly with cooking spray or oil. This prevents sticking and makes it easy to remove the donuts later.

In a large mixing bowl, combine these dry ingredients:

- 1 ½ cups almond flour

- ½ cup granulated erythritol (or sweetener of choice)

- 2 teaspoons baking powder

- 1 teaspoon ground cinnamon

- ¼ teaspoon salt

Whisk the dry ingredients until they mix well. In another bowl, whisk together these wet ingredients:

- 3 large eggs

- ¼ cup unsweetened almond milk

- ¼ cup melted coconut oil

- 1 teaspoon vanilla extract

Make sure the mixture is smooth. Now, pour the wet mix into the dry mix. Fold gently until combined. Do not over-mix; this keeps the donuts fluffy.

Baking Process

Spoon the batter into the donut pan, filling each cavity about ¾ full. This helps the donuts rise properly. Place the pan in your preheated oven and bake for about 15-18 minutes. The donuts should turn golden. Use a toothpick to check; if it comes out clean, they are done.

Cooling and Coating

Once baked, take the donuts out and let them cool in the pan for about 5 minutes. After that, transfer them to a wire rack to cool completely. While the donuts cool, mix some extra cinnamon and erythritol together in a small bowl for the topping.

After the donuts are cool, brush the tops with melted butter. Then, dip each donut into the cinnamon-erythritol mix. This adds a sweet and spicy coat. Enjoy your fluffy keto cinnamon baked donuts!

Tips & Tricks

Achieving Fluffiness

To get the best fluffiness, use fresh baking powder. Old baking powder may not work well. Mix your dry ingredients well before adding the wet ones. This ensures even distribution of the leavening agents. Also, fold the batter gently. Over-mixing can make your donuts dense. When you spoon the batter into the pan, fill each cavity about ¾ full. This allows space for the donuts to rise without spilling over.

Common Mistakes to Avoid

One common mistake is using too much almond flour. Measure it accurately for the best results. Avoid opening the oven door while baking. This can cause your donuts to sink. Another mistake is not letting the donuts cool enough before coating them. If they are warm, the butter will melt off. Lastly, don't skip the cinnamon-erythritol mix. This step adds great flavor and a sweet touch.

Best Practices for Donut Storage

Store your donuts in an airtight container. This keeps them fresh for a few days. Avoid putting them in the fridge, as it can dry them out. If you want to keep them longer, freeze them. Wrap each donut in plastic wrap and place them in a freezer bag. To enjoy, just thaw them at room temperature. Reheat them in the oven for a few minutes for a fresh taste.

Pro Tips

  1. Use Room Temperature Ingredients: Allow your eggs and almond milk to come to room temperature before mixing. This helps create a smoother batter and promotes even baking.
  2. Don’t Overmix the Batter: Gently fold the wet and dry ingredients together to avoid tough donuts. Overmixing can lead to a denser texture.
  3. Proper Cooling: Let the donuts cool in the pan for a few minutes before transferring them to a wire rack. This helps maintain their shape and prevents them from breaking.
  4. Coating Variation: Experiment with different spices for the coating, such as nutmeg or pumpkin pie spice, for a unique flavor twist.

Variations

Flavor Enhancements

You can change the taste of your donuts easily. Try adding cocoa powder to make chocolate donuts. Add a teaspoon of almond extract for a nutty flavor. For a twist, mix in some lemon zest. This brightens the taste and adds freshness. Want a spicier kick? Add a pinch of nutmeg along with cinnamon. These small changes can make your donuts unique each time.

Dietary Substitutions

If you have allergies or dietary needs, don’t worry. You can swap almond flour for coconut flour. Just use less coconut flour since it absorbs more liquid. If you want to skip eggs, use flaxseed meal mixed with water. This creates a great egg substitute. You can also use unsweetened applesauce instead of oil for a lower fat option. These swaps help everyone enjoy these tasty treats.

Alternative Toppings

Toppings can change how your donuts taste. Instead of cinnamon and erythritol, try unsweetened cocoa powder. This gives a rich chocolate flavor. You can also use crushed nuts or unsweetened coconut flakes for crunch. For a fruity twist, add a berry glaze made from blended berries. This adds color and sweetness. Get creative with toppings to make each batch special and fun!

Storage Info

How to Store Leftover Donuts

To keep your fluffy keto cinnamon baked donuts fresh, place them in an airtight container. Store them at room temperature for up to three days. If you want to keep them longer, the fridge can extend their life. Wrap each donut in plastic wrap for best results. This helps them stay moist and tasty.

Freezing Instructions

Freezing is a great option for longer storage. First, allow the donuts to cool completely. Then, wrap each one tightly in plastic wrap. Place the wrapped donuts in a freezer-safe bag or container. You can freeze them for up to three months. When you’re ready to enjoy them, just thaw at room temperature.

Reheating Tips

To reheat your donuts, you have a few options. The microwave is quick. Warm them for about 10-15 seconds. If you want a crispier texture, use the oven. Preheat the oven to 350°F (175°C) and bake for about 5-7 minutes. This will make them taste fresh again. Enjoy your delicious donuts warm!

FAQs

How to Make Donuts without Almond Flour?

You can make donuts without almond flour by using coconut flour. Use less coconut flour. A good ratio is about 1/4 cup of coconut flour for every cup of almond flour. This is because coconut flour absorbs more liquid. Adjust the liquid in your recipe. You will need to add more eggs or milk to keep the batter moist.

Can I Use Different Sweeteners?

Yes, you can use different sweeteners. Many types work well in this recipe. You can try monk fruit, stevia, or allulose. Each sweetener has its own flavor and sweetness level. Adjust the amount based on the sweetener you choose. Always check the package for the right measurements.

What is the Best Way to Serve Keto Donuts?

The best way to serve keto donuts is warm. You can add a drizzle of melted chocolate or a sprinkle of nuts for extra flavor. Serve with coffee or tea for a tasty treat. A fresh berry or mint leaf can add color and freshness to your plate. Enjoy them fresh, or store them for later!

This blog post covered the essential ingredients for making delicious donuts. We explored their benefits and helpful substitutions. You learned step-by-step how to prepare, bake, cool, and coat your donuts. I shared tips to avoid common mistakes and store your treats well. Variations for flavors and toppings added fun twists. Finally, I answered key questions to make this process easier. Now, you have a solid plan to create and enjoy your donuts!

prep cook servings cal
Pin Recipe

Ingredients

Instructions

Fluffy Keto Cloud Eggs with Chives Recipe Guide

Fluffy Keto Cloud Eggs with Chives

Looking for a delicious and easy keto-friendly breakfast? Let me introduce you to Fluffy Keto Cloud Eggs with Chives! This recipe not only tastes amazing, but it's also low in carbs and packed with protein. Perfect for busy mornings or weekend brunches, you can whip these cloud eggs up in no time. So, grab your ingredients and let’s elevate your breakfast game today!

Why I Love This Recipe

  1. Light and Fluffy Texture: These cloud eggs are incredibly airy and soft, making them a delightful contrast to traditional baked eggs.
  2. Keto-Friendly: With low carbs and high fats, this recipe fits perfectly into a ketogenic diet without sacrificing taste.
  3. Customizable: You can easily adjust the flavors by using different herbs or cheeses, tailoring the dish to your personal preferences.
  4. Impressive Presentation: The fluffy mounds create a visually stunning dish that's perfect for brunch or special occasions.

Ingredients

List of Necessary Ingredients

- 4 large eggs

- 2 tablespoons cream cheese (softened)

- 1/4 teaspoon garlic powder

- Salt and pepper to taste

- 2 tablespoons fresh chives, finely chopped

- 1/4 cup shredded cheese (cheddar or cheese of your choice)

- Olive oil spray (for greasing)

When making fluffy keto cloud eggs, use fresh ingredients for the best taste. The eggs should be large and at room temperature. This helps them whip better. The cream cheese adds a rich, creamy texture. Garlic powder gives a nice flavor, while chives add freshness. You can choose any cheese you like.

Nutritional Information

- Carb count per serving: 2 grams

- Caloric breakdown: 150 calories

- Protein and fat content: 8 grams protein, 12 grams fat

These cloud eggs are low in carbs and high in protein, making them great for a keto diet. Each serving has only 2 grams of carbs and 150 calories. The balance of protein and fat helps keep you full. Enjoy these as a tasty breakfast or snack!

Ingredient Image 1

Step-by-Step Instructions

Prepping the Oven and Ingredients

First, set your oven to 375°F (190°C). This step is key for a good bake. Next, take a baking sheet and line it with parchment paper. Lightly spray the paper with olive oil. This helps prevent sticking.

Whipping Egg Whites

Now, separate your egg whites from the yolks. Place the whites in a large bowl and the yolks into another bowl. Use an electric mixer to beat the egg whites. Beat them on high speed for about 3-4 minutes until you see stiff peaks. This is when the whites hold their shape well.

Combining Ingredients

In the bowl with the yolks, add softened cream cheese, garlic powder, and a pinch of salt and pepper. Mix this until it is smooth and creamy. Now, gently fold the yolk mixture into the whipped egg whites. Be careful not to deflate them. After mixing, stir in the chopped chives and shredded cheese.

Baking Cloud Eggs

Spoon the fluffy egg mixture onto your prepared baking sheet, making four mounds. You can adjust the size of these mounds if you want. Make a small indentation in the center of each mound. Bake in the oven for 12-15 minutes. Look for a golden brown color on top. The eggs should be set and ready to enjoy.

Tips & Tricks

Achieving Perfect Fluffiness

To make your cloud eggs light and fluffy, use room temperature eggs. Cold eggs can make it hard to whip the whites. This small step helps them hold more air. Beat the egg whites until they form stiff peaks. This means they should stand tall when you lift the beaters. If they are not stiff enough, the eggs will not rise well.

Flavor Enhancements

You can boost flavor by adding herbs or spices. Fresh chives add a nice taste. You might also try parsley or dill for a different twist. Cheese is another fun option. Cheddar is great, but feel free to use your favorite cheese. Think about trying feta or goat cheese for a unique touch.

Presentation Suggestions

For plating, use a large white plate to show off the cloud eggs. Place them in the center of the plate. This draws attention to their fluffy shape. You can serve them on their own, or with sides like avocado or bacon. Adding a fresh salad can make it a full meal.

Pro Tips

  1. Use Fresh Ingredients: Always opt for fresh chives and eggs to enhance the flavor and texture of your cloud eggs.
  2. Beat Egg Whites Properly: Ensure that your mixing bowl is completely clean and free of any grease to achieve the best volume when beating the egg whites.
  3. Experiment with Flavors: Feel free to add different herbs or spices to the egg mixture for a unique twist, such as dill or smoked paprika.
  4. Watch the Baking Time: Keep an eye on your cloud eggs as they bake; oven temperatures can vary, and you want them golden brown but not overcooked.

Variations

Flavorful Additions

You can boost your cloud eggs with more flavors. Try adding fresh herbs like parsley or dill. These herbs add a nice touch and extra taste. You can also mix in diced veggies. Chopped bell peppers or spinach work well. They add color and crunch. This gives you a chance to create a new dish every time.

Dietary Adjustments

If you want to make these eggs dairy-free, you can swap the cream cheese. Use a nut-based cream or avocado instead. This keeps the texture nice and creamy. For a lower fat version, skip the cheese or reduce the amount. You can still enjoy the fluffiness without the extra fat. Adjusting these ingredients makes the recipe fit your diet needs.

Storage Info

How to Store Leftovers

To keep your fluffy keto cloud eggs fresh, store them in the fridge. Place the eggs in an airtight container. This will help keep them moist and tasty. Make sure to eat the leftovers within three days for the best flavor. If you have more than one serving, separate them into individual portions. This way, you can grab a quick meal anytime.

Reheating Instructions

To reheat your cloud eggs, use the oven or an air fryer. Preheat your oven to 350°F (175°C). Place the eggs on a baking sheet. Heat them for about 5-7 minutes. If using an air fryer, set it to 300°F (150°C) and cook for 3-5 minutes. This helps keep the eggs fluffy. Avoid the microwave, as it can make them rubbery and dry.

FAQs

Can I make Cloud Eggs ahead of time?

Yes, you can make cloud eggs ahead of time. Prepare them and store in the fridge. When ready to eat, reheat them gently in the oven. This keeps them fluffy.

How can I make this recipe without cream cheese?

If you want to skip cream cheese, use Greek yogurt instead. It adds creaminess without changing the taste much. You can also try sour cream for a tangy twist.

What can I serve with Fluffy Keto Cloud Eggs?

Fluffy keto cloud eggs pair well with many sides. Try fresh avocado slices for healthy fats. Bacon or sausage adds protein. A simple salad gives a nice crunch too.

Can I freeze Cloud Eggs?

Freezing cloud eggs is not ideal. The texture may change after thawing. If you must freeze them, do it without the chives and cheese. Reheat them carefully after thawing.

Cloud eggs are a fun and tasty dish. You need just a few simple ingredients to make them. We discussed the right steps, from prepping to baking, and shared useful tips. You can customize your cloud eggs for different tastes and diets. Remember to store leftovers properly for the best taste. With this guide, you can whip up delicious cloud eggs that impress. Enjoy your cooking and creative ideas!

prep cook servings cal
Pin Recipe

Ingredients

Instructions

Tangy Keto Lemon Garlic Shrimp Pasta Delight

Tangy Keto Lemon Garlic Shrimp Pasta

Looking for a bright, tasty meal that fits your keto diet? You’ll love my Tangy Keto Lemon Garlic Shrimp Pasta Delight! This dish features zoodles, fresh shrimp, and a burst of lemon flavor. It’s easy to make and perfect for weeknight dinners. Get ready to impress your family with a meal that’s both healthy and delicious. Let’s dive into the ingredients and get cooking!

Why I Love This Recipe

  1. Healthy and Low-Carb: This recipe is perfect for those following a keto diet, allowing you to enjoy pasta without the carbs.
  2. Quick and Easy: With a total time of just 20 minutes, this dish is perfect for a busy weeknight dinner.
  3. Fresh and Flavorful: The combination of lemon, garlic, and fresh parsley brings a burst of flavor that’s both refreshing and satisfying.
  4. Customizable: You can easily adjust the spice level with red pepper flakes or add your favorite veggies for extra nutrition.

Ingredients

Main Ingredients

- 8 oz. zucchini noodles (zoodles)

- 1 lb. shrimp, peeled and deveined

- 4 cloves garlic, minced

- 1 lemon, juiced and zested

Additional Ingredients

- 3 tbsp olive oil, divided

- 1 tsp red pepper flakes (adjust to taste)

- 1/2 cup cherry tomatoes, halved

- 1/4 cup fresh parsley, chopped

Seasoning and Garnish

- Salt and pepper to taste

- Freshly grated Parmesan cheese for garnish (optional)

In this recipe, zucchini noodles shine as a low-carb base. They offer a nice crunch and soak up flavors well. Shrimp brings protein to the table. Choose good-quality, fresh shrimp for the best taste. The minced garlic adds a punch, and the lemon juice brightens every bite.

You can use any olive oil you like. It gives the dish richness and depth. Red pepper flakes add heat, so adjust them based on your spice level. Cherry tomatoes add a sweet burst, and fresh parsley gives a lovely touch of green.

For seasoning, salt and pepper are key. They enhance flavors without overpowering them. If you want a cheesy finish, add Parmesan cheese. It's optional, but it adds a creamy finish.

Ingredient Image 1

Step-by-Step Instructions

Preparing Zucchini Noodles

1. First, grab a zucchini. Use a vegetable spiralizer to turn it into noodles.

2. Make sure the zoodles are not too thick. Set them aside in a bowl for later.

Cooking the Shrimp

1. Next, heat 2 tablespoons of olive oil in a large skillet over medium heat.

2. Add 4 cloves of minced garlic and 1 teaspoon of red pepper flakes. Sauté for about 1 minute until you smell the garlic.

3. Now, add 1 pound of peeled and deveined shrimp. Season with salt and pepper. Cook for 2-3 minutes on each side until the shrimp is pink and fully cooked.

4. Once done, take the shrimp out of the skillet and set them aside.

Combining Ingredients

1. In the same skillet, add 1 tablespoon of olive oil, the zucchini noodles, and 1/2 cup of halved cherry tomatoes. Sauté for 2-3 minutes until the zoodles are tender but still firm.

2. Return the cooked shrimp to the skillet. Add the zest and juice of 1 lemon. Toss everything together and heat for another minute.

3. Finally, remove the skillet from heat and stir in 1/4 cup of chopped fresh parsley. Adjust the seasoning if needed. Serve hot, with grated Parmesan cheese on top if you like.

Tips & Tricks

Perfecting the Texture

How can I achieve firm zucchini noodles? To get firm zoodles, spiralize fresh zucchini. After spiralizing, set the zoodles aside. Avoid overcooking them. Sauté just until tender but still firm. This keeps them from getting mushy.

How do I cook shrimp to the right doneness? Cook shrimp until they turn pink. This usually takes about 2-3 minutes per side. Overcooked shrimp can become tough. Remove them from heat as soon as they are done.

Flavor Enhancements

What other herbs and spices can I use? You can add basil or oregano for more flavor. Fresh thyme also works well. Experiment with different herbs to find your favorite mix.

How can I adjust spice levels with red pepper flakes? Start with a small amount of red pepper flakes. You can always add more if you like heat. Just remember, a little goes a long way.

Keto Substitutions

What are low-carb alternatives to traditional pasta? Zucchini noodles are a perfect low-carb option. You can also try spaghetti squash or shirataki noodles. Both are great choices for a keto diet.

How do I choose the right types of shrimp? Look for shrimp that are fresh and firm. Frozen shrimp works too. Choose peeled and deveined shrimp for ease. Wild-caught shrimp often have better flavor than farmed.

Pro Tips

  1. Use Fresh Shrimp: Always opt for fresh shrimp over frozen for the best flavor and texture. If using frozen, ensure they are completely thawed and patted dry before cooking.
  2. Perfect Zoodles: To avoid soggy zucchini noodles, sauté them for just a few minutes until tender but still firm. This keeps them from releasing too much moisture.
  3. Adjust Spice Level: Feel free to modify the amount of red pepper flakes according to your heat preference. You can also substitute with fresh chili if you prefer a different flavor.
  4. Garnish for Flavor: Don’t skip the fresh parsley and Parmesan cheese as they add a burst of flavor and visual appeal to your dish. Fresh herbs can elevate the overall taste significantly.

Variations

Different Proteins

You can switch up the shrimp for chicken or tofu. Both options add great flavor. If you use chicken, cut it into small pieces. Cook it in the skillet until it’s no longer pink. This will take about 5-7 minutes. Tofu needs a bit more time. You should brown it for about 8-10 minutes, making sure it’s firm.

Vegetable Additions

Adding veggies makes this dish more colorful and healthy. Spinach is a great choice. It cooks quickly and adds nice nutrients. Bell peppers are also tasty. They add a sweet crunch. Other good options for keto meals are broccoli and asparagus. Just remember to keep the cooking time short. You want your veggies to stay crisp.

Sauces and Dressings

Want to change the sauce? Try a creamy avocado mix. Mash ripe avocados with lemon juice and garlic. This makes a nice, smooth sauce. If you love spice, add a spicy garlic sauce. Mix minced garlic with olive oil and chili. Drizzle it over the top for a kick. These sauces give you fun ways to enjoy this dish!

Storage Info

Refrigeration

To store leftovers, place the dish in an airtight container. You want to keep it fresh. The recommended duration for freshness is up to three days in the fridge. After that, the flavors may fade.

Freezing Instructions

You can freeze this dish for later use. Just let it cool completely before packing it into a freezer-safe container. You can store it for up to three months. For reheating, thaw it overnight in the fridge. Then, warm it in a skillet over low heat until heated through.

Meal Prep Suggestions

Prep your ingredients ahead of time for easy meals. Spiralize the zucchini and store it in the fridge. You can also peel and devein the shrimp in advance. This makes for quick assembly. When ready to cook, just sauté everything together. It’s a fast and easy way to enjoy this tasty dish.

FAQs

Can I use regular pasta instead of zoodles?

You can use regular pasta, but it breaks keto rules. Zoodles have fewer carbs. A cup of cooked pasta has about 40 grams of carbs. In contrast, zoodles only have about 4 grams. If you want to stay true to keto, stick with zucchini noodles. They keep this dish light and fresh.

How can I make this recipe dairy-free?

To make this recipe dairy-free, skip the Parmesan cheese. You can also use nutritional yeast as a cheese substitute. It adds a nice flavor without dairy. Another option is to use a dairy-free cheese. Look for brands that fit your taste. This way, you can still enjoy the creamy notes without any dairy.

What are the best sides to serve with Tangy Keto Lemon Garlic Shrimp Pasta?

Great sides for this dish include a fresh salad or steamed veggies. A simple arugula salad with lemon dressing pairs well. Roasted broccoli or asparagus also complement the meal. These sides keep your plate colorful and healthy. You can add avocado for healthy fats too.

This recipe shows how to make a tasty Tangy Keto Lemon Garlic Shrimp Pasta. We covered the main ingredients like zoodles, shrimp, and garlic, and also added tips for the best taste and texture. You learned how to cook the shrimp perfectly and combine it with vibrant zoodles and fresh veggies. Remember, you can adjust flavors and experiment with different proteins. Enjoy a healthy, low-carb meal that feels indulgent but stays light. With these simple steps, you can prepare a satisfying dish any night of the week.

prep cook servings cal
Pin Recipe

Ingredients

Instructions

Decadent Keto Chocolate Fudge Brownies to Indulge

Decadent Keto Chocolate Fudge Brownies

Craving a rich, chocolatey treat that fits your keto lifestyle? You’re in the right place! These Decadent Keto Chocolate Fudge Brownies are decadent, easy to make, and perfect for satisfying your sweet tooth without guilt. With simple ingredients and step-by-step instructions, you’ll whip up a batch in no time. Let’s dive into this delicious recipe that will have you indulging, while sticking to your keto goals!

Why I Love This Recipe

  1. Deliciously Decadent: These keto brownies are rich and fudgy, satisfying all your chocolate cravings without the carbs.
  2. Easy to Make: With just a few simple ingredients and straightforward steps, you can whip these up in no time.
  3. Healthy Ingredients: Made with almond flour and unsweetened cocoa powder, these brownies are a guilt-free dessert option.
  4. Customizable: Add sugar-free chocolate chips or top with whipped coconut cream for an extra indulgent treat!

Ingredients

List of Ingredients for Decadent Keto Chocolate Fudge Brownies

To make these tasty brownies, gather the following ingredients:

- 1 cup almond flour

- 1/2 cup unsweetened cocoa powder

- 1/2 cup erythritol (or your favorite keto sweetener)

- 1 teaspoon baking powder

- 1/4 teaspoon salt

- 3/4 cup unsweetened applesauce

- 1/3 cup coconut oil, melted

- 1 teaspoon vanilla extract

- 1/2 cup sugar-free dark chocolate chips (optional)

Nutritional Information per Serving

Each brownie has about:

- Calories: 130

- Fat: 10g

- Carbohydrates: 6g

- Fiber: 3g

- Protein: 3g

- Sugar: 1g

This makes them a great option for a keto diet.

Potential Ingredient Substitutions

Here are some easy swaps if you need them:

- Almond flour: You can use coconut flour, but use less (1/4 cup).

- Erythritol: Any keto-friendly sweetener works, like monk fruit or stevia.

- Unsweetened applesauce: Try mashed avocado or pumpkin puree for a different taste.

- Coconut oil: You can use butter or ghee instead.

- Sugar-free dark chocolate chips: Use chopped nuts or leave them out for fewer carbs.

With these choices, you can adjust the recipe to fit your needs while keeping it delicious!

Ingredient Image 1

Step-by-Step Instructions

Prepping the Oven and Baking Pan

First, you need to preheat your oven to 350°F (175°C). This step is key. While the oven heats up, grab your 8x8 inch baking pan. You can grease it with some coconut oil or line it with parchment paper. Lining the pan helps you remove the brownies easily later.

Mixing Dry Ingredients

In a medium bowl, combine the following dry ingredients:

- 1 cup almond flour

- 1/2 cup unsweetened cocoa powder

- 1/2 cup erythritol (or your favorite keto sweetener)

- 1 teaspoon baking powder

- 1/4 teaspoon salt

Whisk these together until they blend well. This mix gives your brownies a rich, chocolatey flavor.

Incorporating Wet Ingredients

Now, in another bowl, mix these wet ingredients:

- 3/4 cup unsweetened applesauce

- 1/3 cup melted coconut oil

- 1 teaspoon vanilla extract

Stir them until it's smooth. This step adds moisture and flavor to your brownies. Gradually add this wet mix to the dry mix. Stir gently until just combined. If you want, fold in 1/2 cup of sugar-free dark chocolate chips for extra chocolate goodness.

Baking and Cooling Process

Pour the brownie batter into your prepared pan. Spread it evenly with a spatula. Bake in your preheated oven for 25-30 minutes. To check if they are done, insert a toothpick into the center. It should come out mostly clean, with a few moist crumbs. Once baked, let the brownies cool in the pan for at least 10 minutes. Then, use the parchment paper to lift them out. Let them cool completely on a wire rack before cutting them into squares.

Tips & Tricks

Achieving the Perfect Fudge Texture

To get that rich, fudge-like texture, watch your baking time. Bake the brownies until a toothpick shows a few moist crumbs. If you bake too long, they will dry out. I recommend starting with 25 minutes and checking from there. Letting them cool in the pan helps keep them moist and fudgy, too.

Enhancements for Flavor

You can boost flavor in many ways. Adding nuts like walnuts or pecans gives a nice crunch. Use 1/2 cup for a great bite. You might also try adding extracts. A teaspoon of almond or hazelnut extract can make a big difference. If you want a chocolate burst, mix in sugar-free dark chocolate chips. They melt nicely and add depth.

Common Mistakes to Avoid

One common mistake is skipping the greasing or lining of the pan. This can lead to brownies sticking, making them hard to remove. Also, don’t rush mixing the wet and dry ingredients. Mix until just combined to keep them fluffy. Lastly, avoid overbaking. Check them often to ensure you keep that fudgy center.

Pro Tips

  1. Use Room Temperature Ingredients: Allow your coconut oil and applesauce to be at room temperature for better mixing and a smoother batter.
  2. Check for Doneness: Since ovens can vary, check your brownies a few minutes early to avoid overcooking and ensure they remain fudgy.
  3. Store Properly: Keep leftover brownies in an airtight container at room temperature for up to a week or refrigerate for longer freshness.
  4. Experiment with Flavors: Try adding a pinch of espresso powder or a dash of peppermint extract to enhance the chocolate flavor.

Variations

Adding Flavors (mint, orange, etc.)

You can enhance your brownies with fun flavors. Add a few drops of mint extract for a fresh twist. Orange zest also adds a bright citrus note. You might try a mix of both for a unique taste. Experiment with flavors to find your favorite combo.

Different Sweetener Options

Erythritol works well, but you can choose others too. Monk fruit sweetener is a great option. Stevia is another choice, but use it sparingly. Each sweetener has its own taste, so pick one that you love. Adjust the amount based on your sweetness preference.

Serving Suggestions

Serve these brownies on a rustic wooden board for a nice touch. A light dusting of cocoa powder makes them look fancy. For added creaminess, top each brownie with whipped coconut cream. You can even serve them with fresh berries on the side. Enjoy these brownies warm for an extra treat!

Storage Info

Best Ways to Store Brownies

To keep your decadent keto chocolate fudge brownies fresh, store them in an airtight container. This will prevent them from drying out. You can place parchment paper between layers to avoid sticking. Keep the container in a cool, dark place, like a pantry or cupboard.

How Long Do They Last?

When stored properly, these brownies can last about 5 days at room temperature. If you want them to last longer, consider refrigerating them. In the fridge, they can stay fresh for about a week. Just remember to seal them well to avoid any moisture.

Freezing Instructions

Freezing your brownies is a great way to enjoy them later. Cut the brownies into squares before freezing. Wrap each piece in plastic wrap, then place them in a freezer bag. They can last up to three months in the freezer. When you want a treat, just thaw them in the fridge or let them sit at room temperature for a bit.

FAQs

Can I use coconut flour instead of almond flour?

No, you cannot swap coconut flour for almond flour directly. Coconut flour soaks up more liquid. This means you need to adjust your recipe. Typically, use one-fourth the amount of coconut flour. You will also need more liquid or eggs to balance it.

How do I make these brownies more cake-like?

To make these brownies more cake-like, add an extra egg. This will help the brownies rise. You can also mix in a little more baking powder. This will give them a lighter texture. Bake them for a shorter time, about 20-25 minutes.

Are keto brownies suitable for meal prep?

Yes, keto brownies are great for meal prep. They store well in the fridge for up to a week. Cut them into squares before storing. This makes it easy to grab and go. You can also freeze them for longer storage.

What's the best way to reheat brownies?

To reheat brownies, use the microwave. Heat them for 10-15 seconds. This keeps them soft and fudgy. You can also warm them in the oven. Preheat the oven to 350°F and bake for 5-10 minutes.

Can I substitute applesauce for another ingredient?

Yes, you can swap applesauce for mashed bananas. This will change the flavor a bit. You can also use Greek yogurt for a creamier texture. Just remember, this may add more carbs.

This blog post covered everything you need for tasty keto chocolate fudge brownies. We explored ingredients, step-by-step baking instructions, and tips for the best texture. You learned about flavor variations and how to store these treats properly. Remember, small changes in ingredients can lead to big taste shifts. I hope you feel ready to bake delicious keto brownies that suit your taste and diet. Enjoy every bite and share your creations!

prep cook servings cal
Pin Recipe

Ingredients

Instructions

Easy Keto Balsamic Chicken and Veggies Delight

Easy Keto Balsamic Chicken and Veggies

Tired of the same old dinner routine? Let’s shake things up with my Easy Keto Balsamic Chicken and Veggies Delight! This dish is not only packed with flavor but also fits perfectly into your keto lifestyle. I’ll share simple ingredients, step-by-step instructions, and handy tips to ensure your chicken is juicy and veggies are perfectly roasted. Ready to make a meal that’s tasty and healthy? Let’s dive in!

Why I Love This Recipe

  1. Quick and Easy: This recipe is simple to prepare, making it perfect for busy weeknights.
  2. Healthy Ingredients: With lean chicken and vibrant veggies, this dish is packed with nutrients.
  3. Delicious Flavor: The balsamic vinegar adds a sweet and tangy taste that elevates the dish.
  4. Keto-Friendly: This recipe fits perfectly into a keto diet, helping you stay on track with your goals.

Ingredients

Complete list of ingredients for Easy Keto Balsamic Chicken and Veggies

- 4 boneless, skinless chicken thighs

- 2 cups broccoli florets

- 1 red bell pepper, sliced

- 1 zucchini, sliced

- 1/4 cup balsamic vinegar

- 2 tablespoons olive oil

- 3 cloves garlic, minced

- 1 teaspoon dried oregano

- 1 teaspoon dried basil

- Salt and pepper to taste

- Fresh parsley for garnish

Key ingredients and their keto benefits

The chicken thighs add protein without carbs. This helps keep you full. They are also juicy and flavorful, making them a great choice for this dish.

Broccoli is low in carbs and high in fiber. It packs vitamins and minerals. It supports digestion while adding crunch to your meal.

Red bell pepper brings a sweet taste and bright color. It is rich in antioxidants and vitamins. This veggie can help boost your immune system.

Zucchini is another low-carb option. It adds moisture and texture. Plus, it is versatile and absorbs the flavor of the balsamic vinegar well.

Balsamic vinegar adds a tangy richness. It is lower in sugar compared to other dressings, making it ideal for keto. Olive oil provides healthy fats, which are important on the keto diet.

Tips for selecting fresh veggies

When picking veggies, look for vibrant colors and firm textures. For broccoli, the florets should be tight and green. Avoid any yellowing or wilting.

Select red bell peppers that feel heavy and have smooth skin. They should have a bright color without any blemishes.

For zucchini, choose ones that are small to medium-sized. They should feel firm and have shiny skin. This ensures they are fresh and flavorful.

By picking fresh ingredients, you enhance the taste and health benefits of your Easy Keto Balsamic Chicken and Veggies.

Ingredient Image 1

Step-by-Step Instructions

Preparation of the chicken marinade

Start by mixing the marinade. In a large bowl, add olive oil, balsamic vinegar, minced garlic, dried oregano, dried basil, salt, and pepper. Whisk until it’s smooth. Then, add the chicken thighs to the bowl. Make sure each piece is well coated in the marinade. Let the chicken sit for 15-20 minutes. This helps the flavors soak in nicely.

Baking instructions for chicken and veggies

While the chicken marinates, preheat your oven to 400°F (200°C). Take a baking sheet and spread out the broccoli florets, sliced red bell pepper, and sliced zucchini. Drizzle a bit of olive oil over the veggies. Season with salt and pepper, then toss to coat them evenly. Next, place the marinated chicken thighs on top of the veggies. Bake everything in the preheated oven for 25-30 minutes. Check if the chicken reaches an internal temperature of 165°F (75°C). The veggies should be tender and a bit caramelized. After baking, let it rest for 5 minutes. Then, garnish with fresh parsley.

Recommended cooking tools

Use a large mixing bowl for the marinade. A whisk helps blend the ingredients well. A baking sheet is great for roasting the chicken and veggies together. An instant-read thermometer is good for checking the chicken’s doneness. Finally, grab a cutting board and knife to easily slice the veggies. Enjoy your meal!

Tips & Tricks

How to ensure chicken stays juicy

To keep your chicken juicy, start with thighs. Chicken thighs have more fat than breasts. This fat helps keep the meat moist as it cooks. Marinate your chicken for at least 15 minutes. The balsamic vinegar adds flavor and tenderizes the meat. Avoid overcooking; aim for an internal temp of 165°F. Rest your chicken for 5 minutes after baking. This allows the juices to settle for a better bite.

Best practices for roasting vegetables

Roasting veggies can be simple and fun. Cut the broccoli, bell pepper, and zucchini into even pieces. This helps them cook evenly. Toss the veggies with olive oil, salt, and pepper. Space them out on the baking sheet. This prevents steaming and helps them caramelize. Bake until they are tender and slightly golden. This adds flavor and makes them taste great with your chicken.

Making ahead: marinade time and cooking tips

You can prep the chicken in advance. Marinate it the night before for the best flavor. Store it in the fridge. This saves time on a busy day. For cooking, preheat your oven to 400°F. This ensures even cooking. If you are short on time, you can bake everything at once. Just make sure the chicken and veggies are on the same sheet. Enjoy a tasty and healthy meal with no fuss!

Pro Tips

  1. Marinate for Maximum Flavor: Letting the chicken marinate for at least 15-20 minutes enhances the flavor. For even better results, marinate it overnight in the refrigerator.
  2. Veggie Variations: Feel free to swap the vegetables based on your preference or what's in season. Asparagus, Brussels sprouts, or even carrots can be great additions!
  3. Check Chicken Doneness: Use a meat thermometer to ensure your chicken is cooked properly. It should reach an internal temperature of 165°F (75°C) for safe consumption.
  4. Leftovers Storage: Store any leftovers in an airtight container in the fridge for up to 3 days. Reheat in the oven or microwave for a quick meal!

Variations

Substituting ingredients for different flavors

You can swap out chicken thighs for chicken breasts. This change gives a lighter taste. You can also try different veggies. Asparagus or green beans work well. For a twist, use red wine vinegar instead of balsamic vinegar. It adds a nice zing. Adjust herbs too; try thyme or rosemary for new flavors.

Low-carb side dishes to pair with the meal

If you want a side dish, consider cauliflower rice. It’s a great low-carb option. You can also serve a simple salad with mixed greens. Toss in some avocado for healthy fats. Another idea is sautéed spinach. It cooks fast and pairs well with the chicken and veggies.

Alternate cooking methods (grilling, stovetop)

You can grill the chicken and veggies if you prefer. Just marinate as directed. Then, grill on medium-high heat for about 6-8 minutes per side. This method gives a smoky flavor. If you like stovetop cooking, heat a skillet. Add olive oil, then cook the chicken first. After, add veggies until they are tender. This method is quick and keeps things simple.

Storage Info

Proper storing techniques for leftovers

To keep your Easy Keto Balsamic Chicken and Veggies fresh, let it cool first. Place it in an airtight container. This keeps moisture in and air out. Store it in the fridge for up to four days. Make sure to label the container with the date. This helps you know when to eat it.

Reheating instructions for maintaining flavor and texture

When you want to reheat your meal, use the oven for best results. Preheat the oven to 350°F (175°C). Place the chicken and veggies on a baking sheet. Cover with foil to keep moisture. Heat for about 15-20 minutes, or until warm. This method keeps the chicken juicy and the veggies tender.

Freezing tips for longer storage

If you want to store it longer, freezing is a great option. Cut the chicken and veggies into smaller pieces for easy thawing. Place them in freezer-safe bags or containers. Remove as much air as possible to avoid freezer burn. You can freeze it for up to three months. When ready to eat, thaw in the fridge overnight, then reheat.

FAQs

What can I use instead of balsamic vinegar?

If you don't have balsamic vinegar, you can use red wine vinegar. It has a nice tangy flavor. Apple cider vinegar is another good choice. You can mix it with a little honey or sugar substitute for sweetness. This mix will give you a similar taste.

Is this recipe suitable for meal prep?

Yes, this recipe is great for meal prep. You can make it ahead and store it. Just cook the chicken and veggies as directed. Then, let them cool before placing them in airtight containers. It stays fresh in the fridge for about four days. You can reheat it easily in the microwave or oven.

How can I adjust the recipe for different dietary needs?

If you need a dairy-free option, this recipe is already dairy-free. For a lower carb version, skip the bell pepper or zucchini. You can also swap in other low-carb veggies like cauliflower or asparagus. If you're following a paleo diet, stick with the chicken and veggies. Use coconut aminos instead of balsamic vinegar for a soy-free option.

In this blog post, I shared a simple and tasty Easy Keto Balsamic Chicken and Veggies recipe. You learned about the best ingredients and their benefits, step-by-step cooking instructions, and helpful tips for juicy chicken and perfect veggies. We also explored variations to keep meals exciting and storage tips for freshness. Overall, this dish is perfect for meal prep and suits many diets. Enjoy your cooking journey, and remember to get creative with flavors!

prep cook servings cal
Pin Recipe

Ingredients

Instructions